Modify App
Modify is Comingle’s app to communicate with and reprogram your Mod toy through a graphical interface. I’m particularly proud of this app and it’s sad that it never got a chance to see wide usage. Our goal was to make a sex toy that was accessible and fun to many audiences, including people that didn’t know how or want to deal with writing code. It is the only software I know of that really tried to put a nice interface over Arduino programming.
Architecture
This was my first Ember project (thanks to much initial work done on this app by Dougall) and I really enjoyed working with it. The backend is Rails and has some funky code in place to generate functional Arduino bytecode.
The backend contains many “components”, which are standalone bits of Arduino code. A vibration pattern would be a component, and there would also be a component for coding various button behaviors: decrease power, increase speed, switch to previous pattern, stop pattern play, etc.
Each component has 3 to it: a global part, a setup() part, and a loop() part. So if you added the pulse pattern to your toy through the app, it would grab the pulse component, and then tack on its global code to the sketch globals, add its setup() code to the sketch’s setup() function and its loop() code to the sketch’s loop() function. The sharp_ramp segment looks like this:
global:
//exponential increase and drop
 int sharp_ramp(int seq) {
   int amp = <%= defined?(amplitude) ? amplitude : 255 %>;
   float freq = <%= defined?(frequency) ? frequency : 0.4 %>;
   float phaseshift = <%= defined?(phase_shift) ? phase_shift : 0 %>;

   Toy.step[0] = sharpMotorOsc(seq, amp, freq, 0);
   Toy.step[1] = sharpMotorOsc(seq, amp, freq, phaseshift);
   Toy.step[2] = sharpMotorOsc(seq, amp, freq, phaseshift * 2);
   Toy.step[3] = 10;

   return 1;
 }
setup:
Toy.addPattern(sharp_ramp);
loop:
(empty)
This defines the pattern function and registers it in the pattern queue.
When the user is happy with their selections in the app, they click an “Upload” button and the app sends a JSON manifest to the backend to generate their desired sketch. The amplitude, frequency and phase_shift ERB variables defined in the sharp_ramp component above would be defined in that manifest. Below is an example manifest:
{
	"general": {
		"serial_console": true,
		"startup_sequence": true,
		"click": {
			"click": "cycle_pattern"
		},
		"double_click": {
			"double_click": "previous_pattern"
		},
		"long_press_start": {
			"long_press_start": "stop"
		}
	},
	"pattern": {
		"weird3": {},
		"pulse_inv": {},
		"third": {},
		"flicker": {},
		"fadeoffset": {},
		"sine_wave": {
			"sineWave": true,
			"amplitude_0": 125.806640625,
			"amplitude_min_0": 3.38671875,
			"frequency_0": 0.04337901318599744,
			"shift_0": 0.6283185307179586,
			"amplitude_1": 0,
			"amplitude_min_1": 0,
			"frequency_1": 0.006283185307179587,
			"shift_1": 1.2566370614359172,
			"amplitude_2": 0,
			"amplitude_min_2": 0,
			"frequency_2": 0.006283185307179587,
			"shift_2": 1.8849555921538759
		}
	},
	"patternOrder": ["weird3", "sine_wave", "third", "flicker", "fadeoffset", "pulse_inv"],
	"nunchuck": {
		"pattern_record": "pattern_record"
	}
}
This is basically a recipe for the backend – it gathers up the components, does variable substitutions, compiles it all, and returns the binary code to the Modify app for uploading to the toy.
The Mod came loaded with a sketch that would allow extensive access via the serial console: the user could toggle the LED, set individual motor powers, run pre-set patterns, increase/decrease pattern power or speed, read inputs, and poll the nunchuck status (joystick, acceleration, pitch, and roll). Modify interacts with this serial console in many ways.
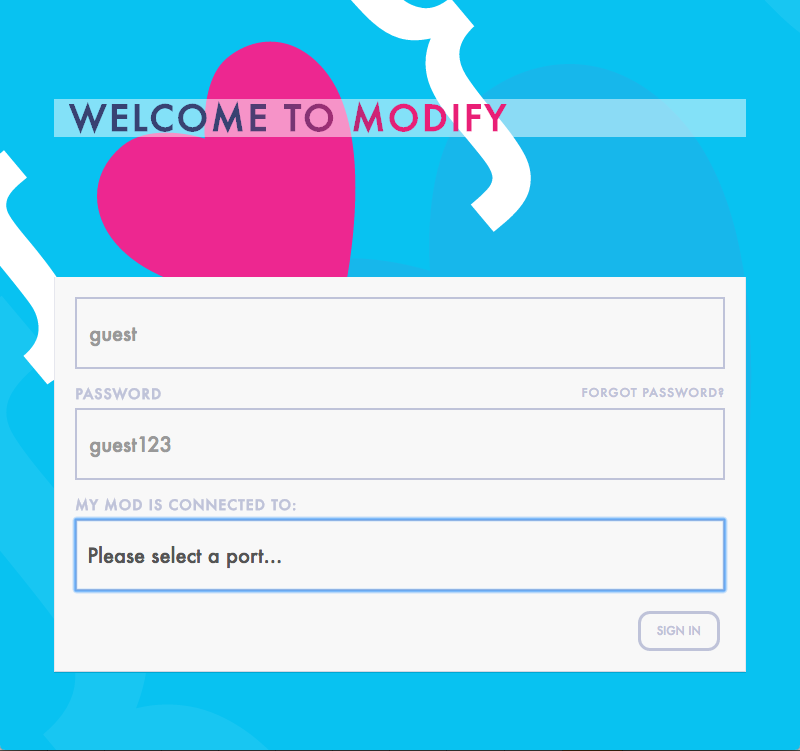
Login
The app does some basic device detection by sending a command over the serial port (f – return device fingerprint, described below) and expecting a packed SHA-256 hash to be returned. This would help us list serial devices that are likely to be a Mod at the top of the device selection dropdown list.
If we received a fingerprint, the server matches it against an internal database of fingerprints to know what software is running on the Mod and then pre-populate various settings in the app.
Arduino device fingerprinting
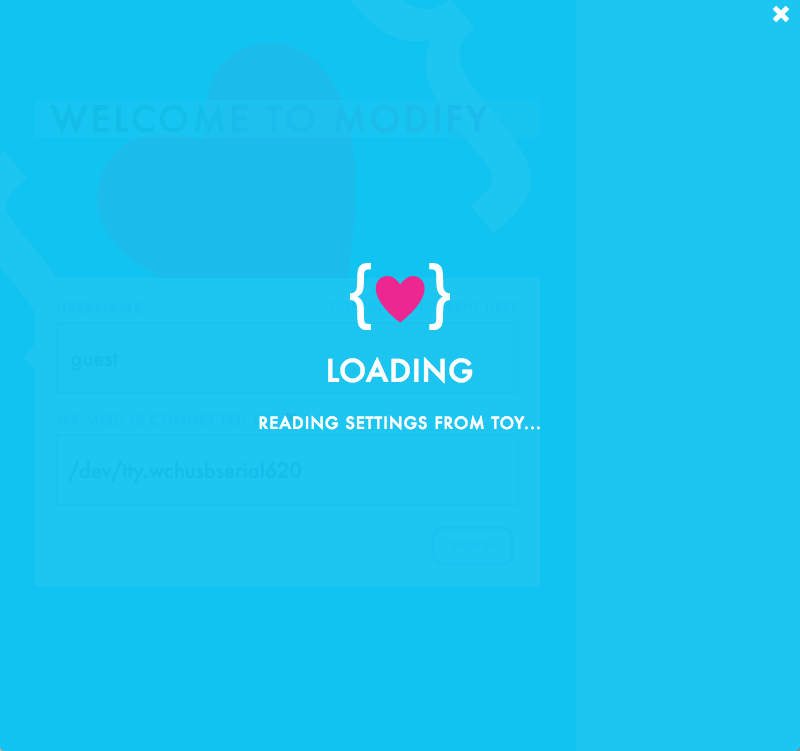
If we did not receive a fingerprint from the f command, the app puts the toy in to bootloader mode to download all of its memory and send it to the backend server.
Once we have the memory dump from the toy, the sketch typically only takes up a fraction of that total space. We have to find where the sketch ends because the remainder of the memory is uninitialized/random and would interfere with generating a consistent SHA-256 hash. It can be difficult to know exactly where the sketch ends and uninitialized memory begins. Because of this, the backend server will go through its entire database of fingerprints and sketch sizes looking for a match. If we have a sketch with fingerprint ABCD1234 and sketch size 15122 then we’d read 15122 bytes of the memory dump, hash it and compare.
There’s also a chicken and egg problem in the toy’s reporting of its fingerprint: The software can’t calculate its own fingerprint so the value needs to be hard-coded in the software. But we can’t know the fingerprint until the software is compiled, and then hard-coding the fingerprint changes the fingerprint.
To work around this, we generate two fingerprints for the toy. The first comes from when the backend generates a new sketch to upload to the toy. In creating the code, it adds an extra command to the serial command parsing section of loop():
  ...
  if (command[0] == 'f') { // Return fingerprint
    Serial.println(F("wwwwwwwwwwwwwwwwwwwwwwwwwwwwwww"));
  ...
The sketch’s fingerprint is calculated based on that “wwwwww…” string being present and the backend compiles that code, hashes it to generate the fingerprint, and then inserts the fingerprint in to the raw binary code at the “wwwww…” string’s memory location. Once that is in place, the backend generates a hash of the new binary code and stores it as a secondary fingerprint; this would be used in the case where the f command didn’t work for whatever reason and the app put the toy in bootloader mode. It would download all of the toy’s memory, incrementally hash it, and discover its secondary fingerprint.
Quicky

Once the server has an idea of what patterns and settings are on the toy, the app puts you in to Quicky Mode. This mode lets you see the current patterns stored on the toy, add/remove patterns, reorganize patterns, and alter pattern settings.
One cool thing about Quicky mode is the ability to preview and experiment with new vibration patterns. Typically this would require uploading new code to the toy, but uploading new code to the Mod (or any Arduino) is a disruptive process: you have to compile the code, put the toy in bootloader mode, upload the code, download the code to verify it, and then reset the toy. It’s too cumbersome to enable much experimentation.
Previewing patterns works by simulating that pattern instead. Conveniently Arduino code is basically C code and the code to generate patterns is very simple. So the backend creates and compiles a standalone C program of the pattern to generate the individual motor commands. These are sent to the Mod over its serial port. Output from the sharp_ramp pattern simulator looks like:
{
	"steps": [
		[8, 8, 8, 2],
		[45, 45, 45, 2],
		[101, 101, 101, 2],
		[164, 164, 164, 2],
		[218, 218, 218, 2],
		[249, 249, 249, 2],
		[250, 250, 250, 2],
		[221, 221, 221, 2],
		[169, 169, 169, 2],
		[106, 106, 106, 2],
		[49, 49, 49, 2],
		[10, 10, 10, 2],
		[0, 0, 0, 2],
		[21, 21, 21, 2],
		[67, 67, 67, 2],
		[129, 129, 129, 2],
		[189, 189, 189, 2],
		[235, 235, 235, 2],
		[253, 253, 253, 2],
		[241, 241, 241, 2],
		[201, 201, 201, 2],
		[142, 142, 142, 2],
		[80, 80, 80, 2]
	]
}
This way the user can drag a slider around and immediately experience how that changes the pattern’s behavior.
Set The Mood
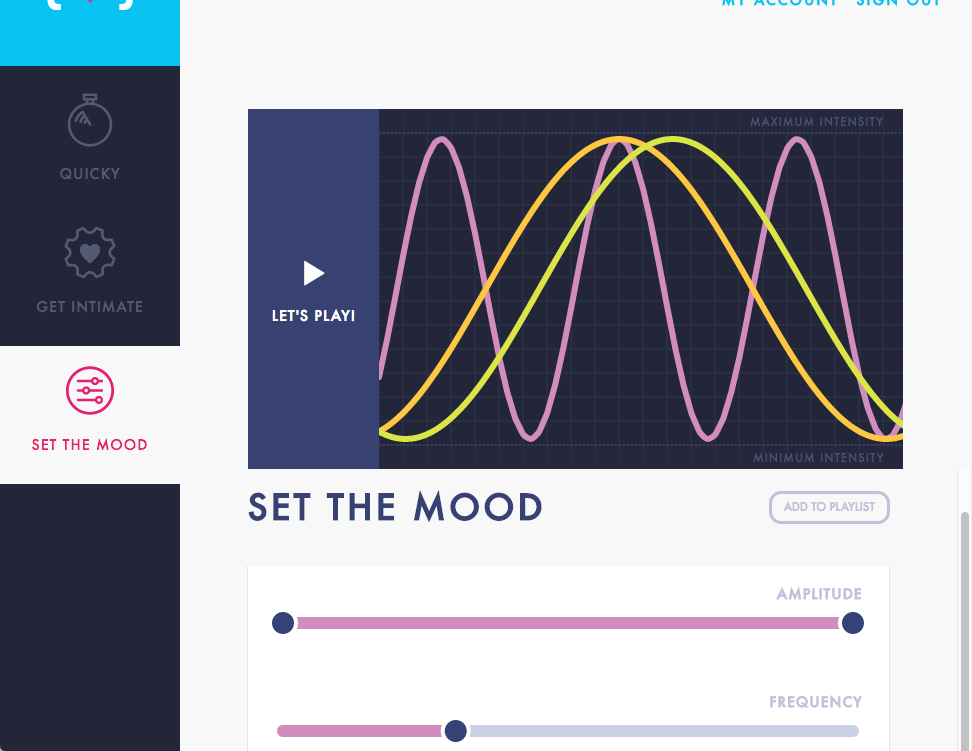
Set The Mood mode lets the user create a simple pattern of their own by assigning a sine wave to each motor and allowing the user to specify phase, amplitude, frequency of the wave. It uses the serial console to enable a pattern preview, just like Quicky mode.
Get Intimate
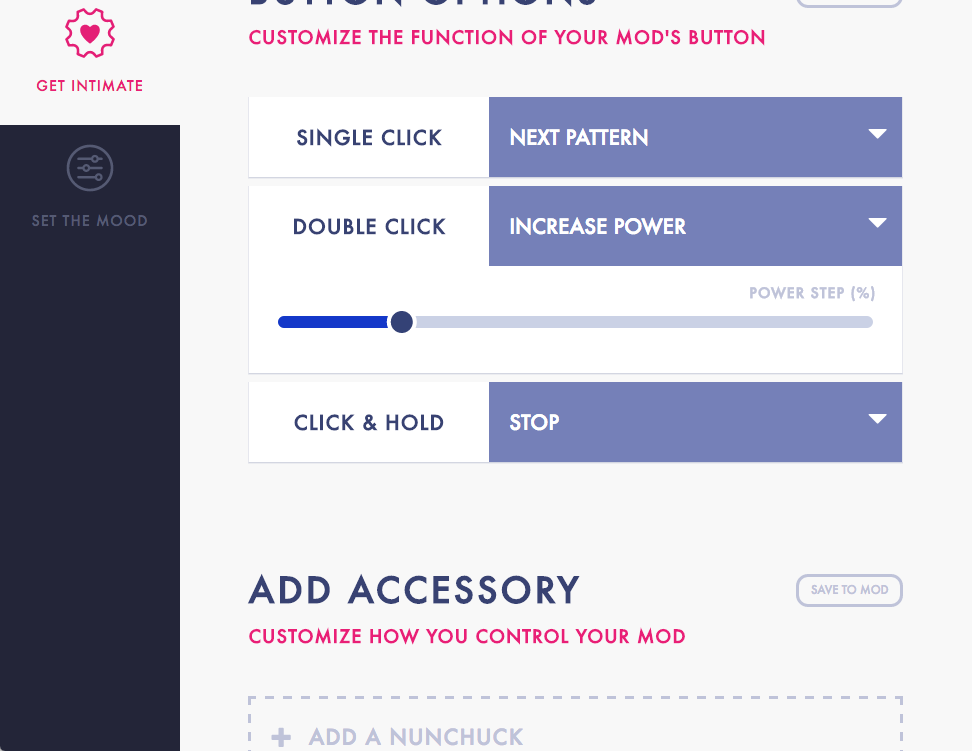
Get Intimate is for adjusting settings about the toy: button click behaviors and Nunchuck configuration primarily. The Nunchuck could be used to add some degree of interactivity to patterns – triggers could be set based on certain tilt/pitch settings.