Concrete Jungle's Fruit Tree Sensors
As part of our collaboration with Georgia Tech, we’ve been developing various strategies for sensing fruit growing in trees. One of those has been to build an electronic nose that can smell fruit and alert us when it’s ripe.
How do we do this? Ideally we’d sense ethylene since it’s produced as a by-product of ripening and also acts as a ripening agent. This is why people say put a piece of fruit in paper bag (optionally with another piece of fruit) to encourage it to ripen – you’re raising the local concentration of ethylene.
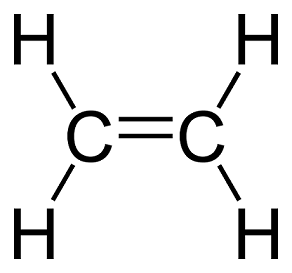
(Ethylene molecule: 2 carbon atoms linked with a double bond. Each carbon has 2 hydrogen atoms bonded to it.)
Ethylene sensors are typically used in commercial fruit storage warehouses, so they’re large and expensive and parts-per-billion accurate. That won’t do for a small-budget project needing small sensors to give a basic “ripe/not ripe” determination.
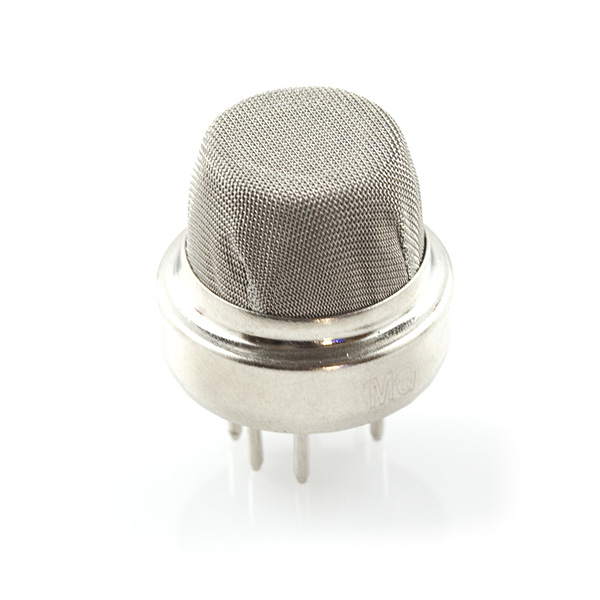
(Taguchi gas sensor. Inside is a small heated semiconductor. Image © Sparkfun CC BY-NC-SA 3.0)
One option we have is semiconductor gas detectors. These are sometimes called tin dioxide sensors or Taguchi gas sensors. The basic principle of these sensors is that as oxygen attaches to the tin dioxide sensor surface it causes the electrical resistance of the sensor to increase. In air, the amount of oxygen doesn’t really change so the sensor should give a steady value. One could consider the sensor at this stage to be oxidized. Going back to high school chemistry, the opposite of oxidation is reduction, so these sensors excel at sensing reducing gases: those gases that remove oxygen from the sensor surface and cause its resistance to decrease. One way to remove oxygen is simply to react with it and at that point we’ve arrived at combustion. When you’re burning or combusting something, it’s reacting with the oxygen in the air and releasing energy to keep you warm, move a piston in your car engine or destroy incriminating evidence.
That’s why when you shop for these types of gas sensors, your only options are combustible gases: hydrogen, propane, methane, alcohol vapor, volatile organic compounds, etc. And even though a sensor might be modified to be more sensitive to hydrogen, propane, or methane, its basic principle of operation dictates that it will react with other gases too. Our hope is that we can use this to our advantage since ethylene is combustible and chemically similar to ethane (which is in turn similar to methane and propane). There may also be other gases that are produced as fruit ripens that we are able to detect.
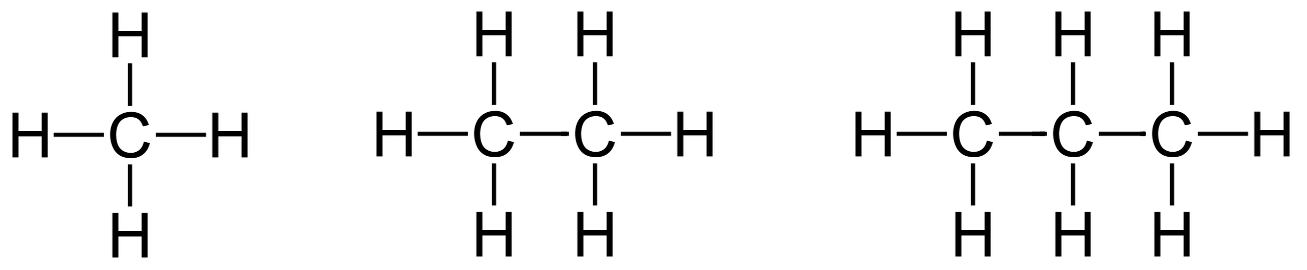 (methane, ethane, and propane)
Version 1
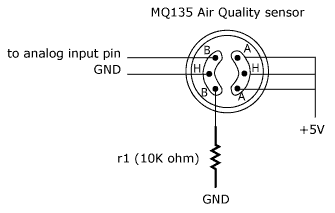
The first version started off with a 5 sensors (MQ7(CO), MQ8(H2), MQ6(LPG), MQ3(Alcohol), and MQ4(CH4)) attached to the analog input pins of an Arduino Uno. It would record sensor data to an SD card every 30 seconds. (Arduino sketch available here.)
Arduino is not really an ideal platform for working with many of these sensors in large part because the power requirements for each sensor. Each sensor draws roughly 150 mA, so at 5V that’s 800mW. According to the UNO’s schematic, the USB power supply on the Arduino has a 500 mA fuse on it, and the barrel jack voltage regulator can handle anywhere from 1000mA to 2200mA, but in order to produce 5V from the regulator, you need a minimum of 6.5V in. At 800mA of current, the regulator will have to dissipate a fair amount of power and will get quite hot. So we have to supply our own 5V supply for the sensors, which is totally doable, but it’s a bit of a pain: you have to get a 5V wall-wart and break out the +/- terminals. And you may even want a 6+V wall wart to run through your own regulator to limit voltage fluctuation. Not a huge deal, but it’s just a bit more distant from a typical plug-n-play Arduino application.
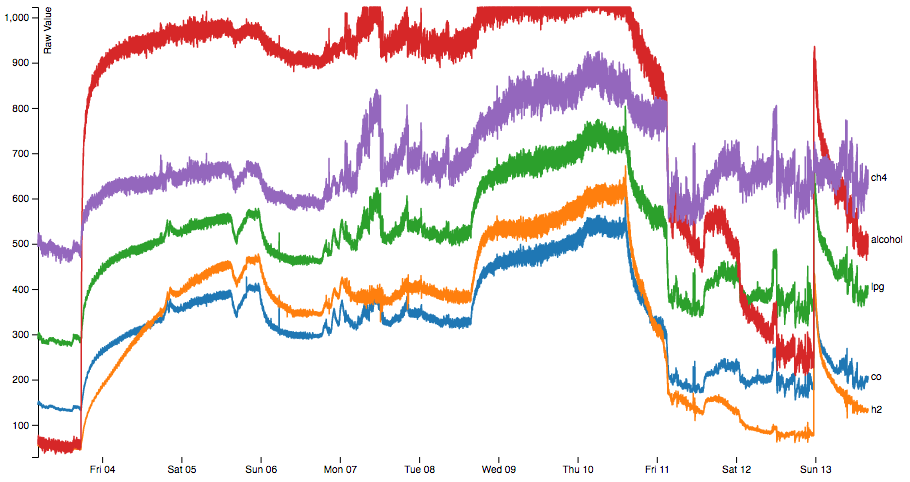
Establish a baseline
As an initial experiment, we put each sensor in a separate sealed bag and recorded the data for a few days to get an idea of their baseline data (assuming not too much off-gassing from the bags).
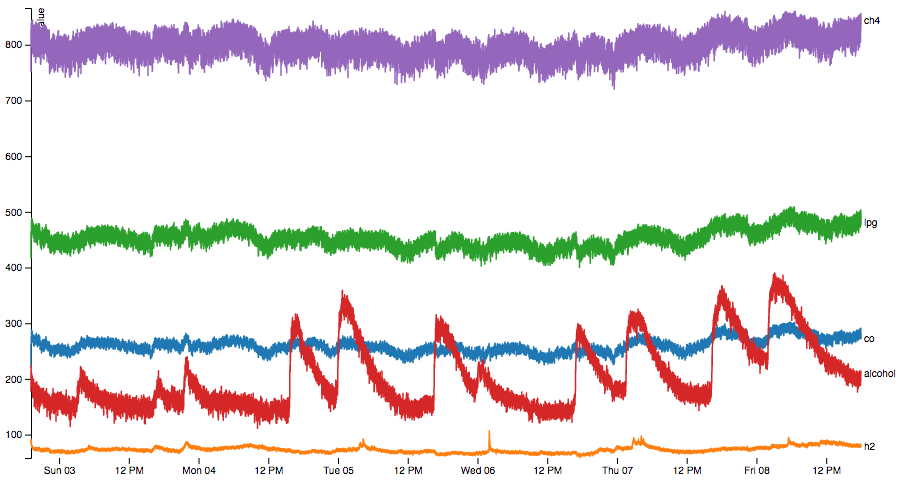
Things to notice:
- Alcohol is probably broken in some way.
- The lines are generally flat. This is good since we just have air in the bag.
- Calibration could be a lot better. Methane hangs out in the 800’s the whole time and our maximum possible reading is 1023. This is probably a limitation of the circuit that will get better in version 2.
- There’s noise that gets worse across sensors. The sensors are connected to the Arduino in the order of CO (on analog input 0), H2 (on analog input 1), LPG (etc), alcohol and CH4, and our data get noisy in almost that exact order.
- Our sensors influence each other. There are many peaks and valleys in the data that overlap exactly across sensors. That does not seem likely given that each sensor is in its own separate mostly-sealed environment.
It’s only a version 1, but this is surprisingly worse than I would have expected. Let’s run some experiments with them and see how they do.
First experiment
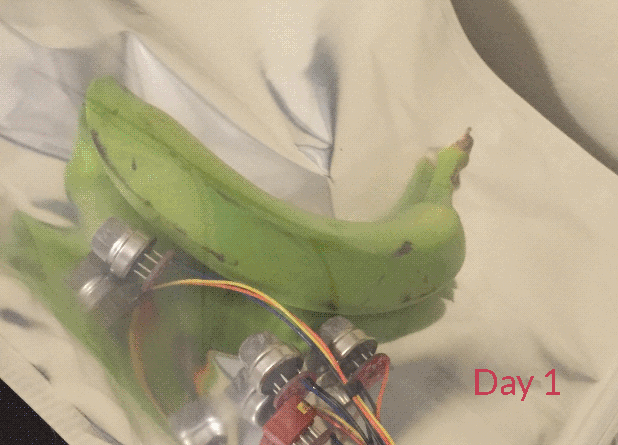
We put all the sensors in a sealed plastic bag with a green banana. Bananas don’t grow in Atlanta but they are really smelly when ripe. If our sensor system can’t detect a banana ripening then it seems like it wouldn’t stand a chance for an apple or pear.
The sensors were all placed in the bag and left running for a day so they could burn-in and be stable. After that, the banana was placed in the bag and the bag was sealed, leaving about 1” unsealed to accommodate the sensor wiring. Our experiment took place over the course of 10 days and we had some reference bananas from the same bunch to compare visually during the experiment and to taste afterwards.
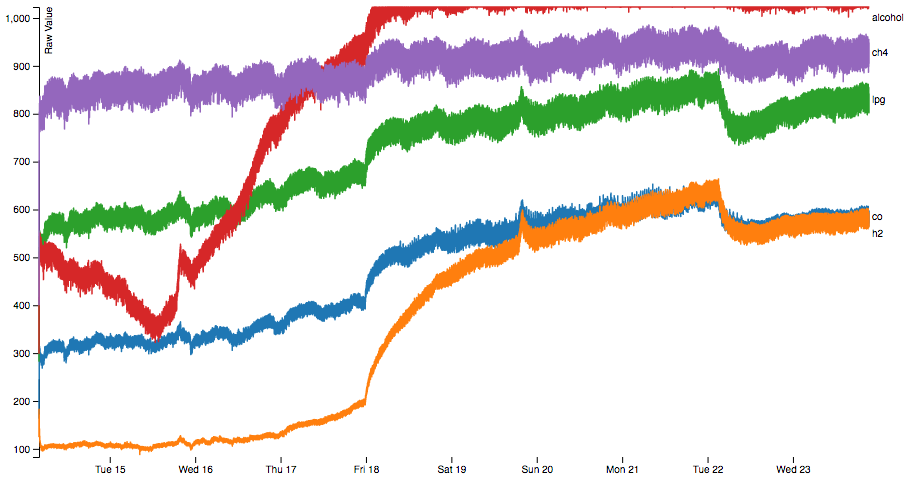
The first nice thing to notice about the data is that it points up and to the right. That’s super cool because it means we’re detecting something in relation to ripeness. But beyond that, we’ve got our usual problems.
Also, the banana ripened really weirdly in the bag and gave off a lot of moisture. It tasted fine in the end, but we probably need to use a water vapor-permeable material like Tyvek in the real world. The last photo in this GIF shows the bag-ripened version on the bottom compared to a banana from the same bunch, but ripened in open air.
Second experiment
Once again we have a trend and once again there’s also a lot of garbage. There is a noisy period there from Sunday the 6th to Wednesday the 9th where I squeezed the bag and tried to distribute the gas around. One can imagine that if I hadn’t done that then there would be a much smoother curve there.
Version 1.5

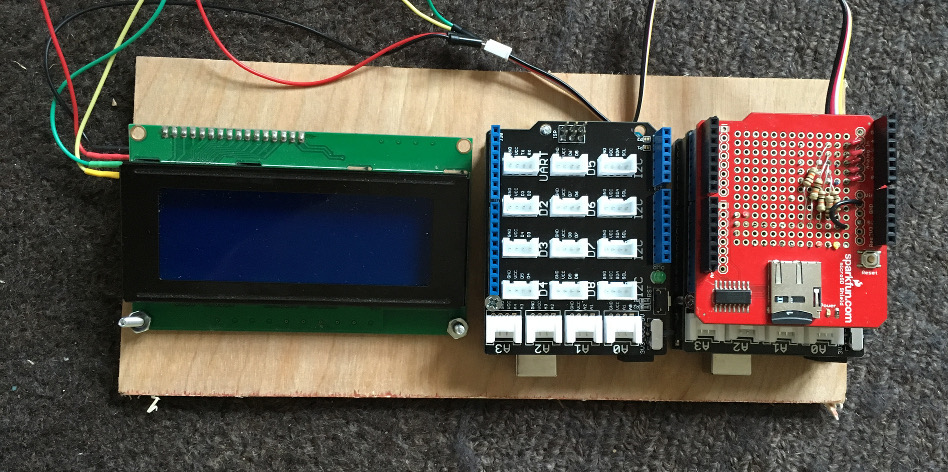
(LCD screen, 2 Arduino UNOs, 2 Seeed Studio Grove shields, one Sparkfun SD card shield)
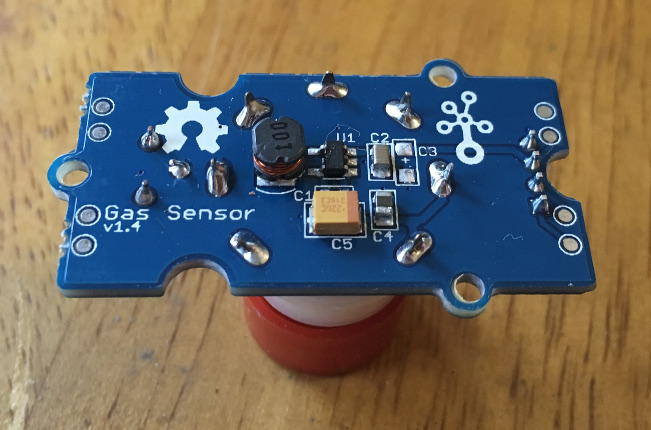
Since I obviously had some hard-to-diagnose electrical error in my wiring, I decided to try the Grove system out from Seeed Studio. The nice thing about the Grove stuff is that it all uses 4 pin connectors and is designed for plug-n-play environmental monitoring.
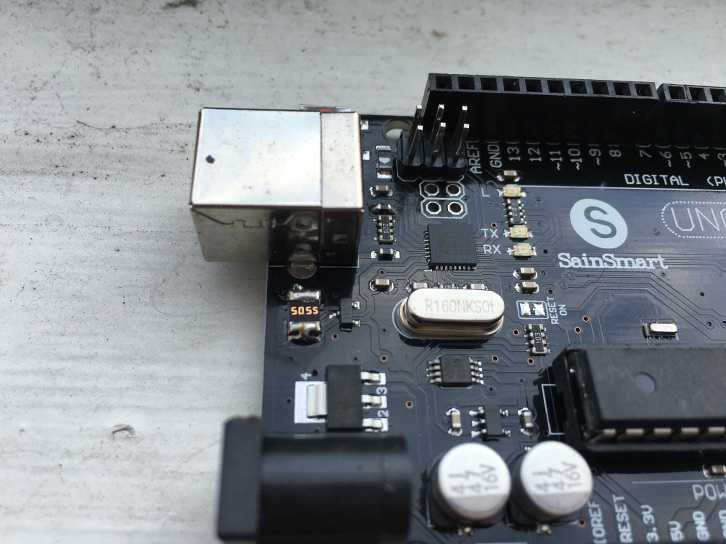
(Arduino UNO with 2 PTC fuses on it (5055 label in photo))
The power supply is still a bit of an issue on the Arduinos, but I came up with a simple solution: I soldered an extra fuse on top of the existing 500mA fuse, which should give 1000mA of total fusing capability, and then it lets me use a 2 amp USB phone charger as my 5V source. I can plug directly in to the USB port without having to cut/strip a cable and have minimal power dissipation concerns. And high-quality USB chargers are cheap as chips these days. I split the sensors among two Arduinos to limit power draw and had them communicate with each other over I2C (Server sketch here and client sketch here)
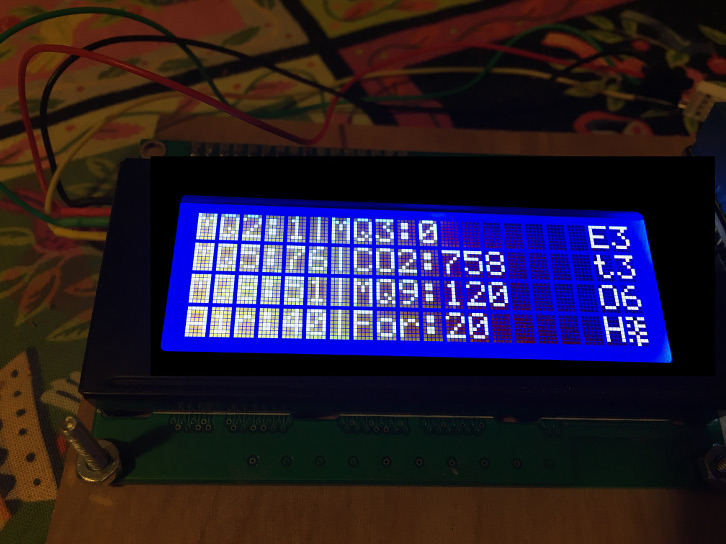
(cramming all 9 sensor readings on to the screen)
Unfortunately, none of this mattered because the sensors do not seem to be well designed. They are nicer than my original setup in that they have a potentiometer on them to let you calibrate their output, but they also seem like they are just made wrong.
(why…)
When setting up this system I noticed that a certain sensor would short out the Arduino every time I plugged it in. This would happen even if I removed the actual gas sensor from the socket, so it was a problem in the breakout board circuitry itself. There’s not much to that circuitry except for a few capacitors, an inductor and an IC. That IC (only labeled in the EAGLE part info) is an ETA1036 step-up voltage converter. The datasheet is super short but it makes one thing clear: max input voltage of 4.5V. This means don’t recommend people connect 5V to it on your wiki.
During the course of figuring this out I managed to cause another sensor to short out the Arduino, and it seemed like a matter of time before all the sensors would fail.
Version 2
This isn’t here yet but is guaranteed to be super awesome and perfect for what we need. I’m excited to tell yall about it when it’s ready!